

Blog
One question we get asked all the time at our candle-making workshops and events is: "How do I make my beautiful candle last longer?" I totally get it! When you invest in a high-quality, hand-poured beeswax candle, you want to enjoy every minute of that warm, cozy glow and delicious fragrance. Today, I'm sharing my favorite insider tips on how to care for your luxury beeswax and coconut oil candles to maximize their burn time and keep them looking and performing beautifully. These simple techniques have helped our customers get up to 30% more burn time from their favorite Chix and Wix candles! The First Burn: Setting Your Candle Up for Success The first time you light your candle might not seem like a big deal, but trust me — it's actually the most important burn of your candle's life! This initial burn establishes the "memory ring" that will affect how your candle burns for its entire lifespan. The Golden Rule : Allow your candle to burn until the entire top layer of wax has melted completely to the edges of the container. Depending on the size of your candle, this could take anywhere from 2-4 hours. Why is this so crucial? Beeswax has a higher melting point than other waxes, and if you don't allow it to melt completely across the top during that first burn, you'll create something called "tunneling." This is when the candle burns straight down the middle, leaving wax stuck to the sides of the container — essentially wasting it! I learned this the hard way with one of my first test candles. I only burned it for 30 minutes before blowing it out, and from then on, it never burned properly. Don't make my mistake! The Perfect Trim: Why Wick Maintenance Matters One of the simplest yet most effective ways to extend your candle's life is proper wick maintenance. Our beeswax and coconut oil candles use cotton wicks specifically sized for optimal burning, but they still need a little TLC. Before each burn: Trim your wick to approximately 1/4 inch. This helps prevent excessive smoke, mushrooming (that little carbon ball that forms at the tip), and too-large flames that can burn through your wax too quickly. I keep a small pair of wick trimmers next to my candle collection, but clean scissors work just as well. Just be careful not to let the trimmed bits fall into the melted wax! The 2-Hour Rule: Timing Your Burns Have you ever noticed that some candles seem to disappear so quickly? The way you schedule your burn sessions can dramatically affect how long your candle lasts. Best practice: Don't burn your candle for less than 1 hour or more than 4 hours at a time. Burning for too short a time doesn't allow the melt pool to reach the edges, contributing to tunneling. Burning for too long can cause the container to overheat and the wick to absorb too much wax, leading to a diminished flame or even safety hazards. I find the sweet spot is about 2-3 hours of burn time per session. This is perfect for a cozy dinner or a relaxing evening bath ritual. It's also why our Sip & Pour candle-making workshops are 2 hours long — the perfect amount of time to enjoy ambiance while protecting your candle investment! Location, Location, Location: Where to Place Your Candle The environment around your candle significantly impacts how it burns. Here are some positioning tips that can help extend your candle's life: Avoid drafts: Air currents cause uneven burning and can dramatically reduce burn time. Keep candles away from open windows, air vents, fans, and high-traffic areas. Create a draft-free zone: If you notice your flame flickering excessively or leaning to one side, try rotating the candle or moving it to a more protected location. Keep it level: Always place your candle on a flat, heat-resistant surface to ensure even melting. In our home, I've designated specific candle spots that I know are protected from drafts. My favorite is on our kitchen island, away from the cooking area but perfect for creating that warm, welcoming atmosphere when friends and family gather. The Luxury of a Clean Burn: Preventing Soot and Debris One of the joys of our natural beeswax and coconut oil candles is their clean-burning nature compared to paraffin alternatives. However, even the cleanest candle can develop issues if not properly maintained. For the cleanest burn: Remove dust from the wax surface before lighting Keep the melt pool free of wick trimmings or matches Extinguish flames properly (more on that below!) Store candles with their lids on when not in use These simple steps help prevent any debris from falling into the melted wax, which can create additional smoke or affect the fragrance throw. The Art of Extinguishing: How to Put Out Your Candle How you extinguish your candle can actually affect its longevity! The wrong technique can cause smoke damage to the container and affect future burns. The best method: Use a candle snuffer or dip the wick into the melted wax and then straighten it back up. This prevents smoke and also primes the wick for its next lighting. Please avoid: Blowing out your candle, which can send wax spattering and create smoke that affects the fragrance. The Refill Revolution: The Ultimate Sustainability Hack When you've enjoyed every last bit of your Chix and Wix candle, don't toss that beautiful container! Our refill program is the ultimate way to extend the life of your candle investment. For just $1.50 per ounce, we'll clean out your container, remove any remaining wax, and pour fresh beeswax and coconut oil blend in your choice of fragrance. It's economical and ecological! I personally love seeing our customers bring back their vessels for refills. It's like greeting old friends, and I love hearing the stories of how our candles have brightened their homes and special moments. Seasonal Storage: Protecting Your Candle Collection If you're like me and have a seasonal rotation of fragrances, proper storage is key to maintaining their quality when not in use. Storage tips: Keep candles in a cool, dry place away from direct sunlight Use the original lids to protect the wax surface Store upright to maintain the centered position of the wick Keep scents separated to prevent fragrance transfer In my home, I have a dedicated cabinet in our guest room closet just for my "resting" candles. It keeps them perfect until their season comes around again! Join Us to Learn More! Want to learn even more candle care tips while creating your own custom scent? Join us at our next Sip & Pour workshop while I share all my candle-making and candle-care secrets!
Hey there! Michelle here from Chix and Wix, and today I want to have an honest conversation about something that changed my life as a candle lover and eventually led Kristy and me to start our business: the surprising truth about paraffin candles and why switching to natural wax alternatives was one of the best decisions we've made for our homes and families. The Paraffin Problem: What You're Really Burning Let me take you back to the moment that changed everything for me. A few years ago, I was a candle-burning enthusiast with a collection that would make any home decor lover jealous. My house always smelled amazing, but I started noticing something concerning - black soot collecting on walls near my favorite candles, and occasionally, my kids and I would experience headaches after a long evening of candlelit relaxation. When I looked into what was happening, I was shocked. Most conventional candles are made from paraffin wax, which is a byproduct of petroleum refining. Yes, the same process that creates gasoline also gives us paraffin! When burned, paraffin candles release a range of potentially harmful chemicals into your home, including: Toluene Benzene Formaldehyde Acetaldehyde These are the same toxins found in diesel fuel emissions, and they're classified as known carcinogens by the EPA. It was no wonder my walls were collecting soot and we were experiencing those headaches! The Natural Alternative: Beeswax and Coconut Oil This discovery led me down a rabbit hole of research into natural candle alternatives, and what I found was game-changing. Beeswax and coconut oil emerged as the clear winners for creating clean-burning, non-toxic candles. Here's why: Beeswax Benefits Beeswax is truly nature's miracle substance. Did you know that beeswax: Actually purifies the air by releasing negative ions that help remove pollutants Burns with virtually no smoke or soot Has a naturally sweet, subtle honey scent Has the highest melting point of natural waxes, meaning longer-lasting candles Supports bee populations and sustainable beekeeping One of my favorite facts about beeswax is that it's the only wax produced by animals (our incredible bees!). It's been used for candles for thousands of years - long before petroleum was even discovered! Coconut Oil Magic We blend our beeswax with coconut oil because this combination creates candles that are: Smooth and creamy with excellent scent throw Slower burning than pure beeswax alone More sustainable than soy (which is often connected to deforestation) Rich in beneficial properties from the natural components of coconut The Difference You'll Notice Immediately When customers switch from paraffin to our natural beeswax and coconut oil candles, they notice several immediate differences: Clean burning experience: No more black soot on walls, ceilings, or inside candle containers. Better breathing: Many customers report fewer headaches and respiratory irritations. Enhanced fragrance experience: Our natural waxes carry scent beautifully without chemical undertones. Longer burning time : Our 8oz candles burn for approximately 45-50 hours with proper care. Warmth and ambiance: The natural golden glow of beeswax creates an unmatched warm ambiance. Making the Switch: Small Changes, Big Impact When Kristy and I founded Chix and Wix, we were driven by the desire to create candles we felt completely safe burning around our own families. We wanted products that aligned with our values of sustainability, health, and supporting local ecosystems. Every Chix and Wix candle is hand-poured in our kitchens in Round Hill and Hamilton, Virginia, using beeswax sourced from responsible beekeepers and the highest quality coconut oil. We use cotton wicks (never lead or metal-core) and phthalate-free fragrance oils or pure essential oils. The result is a luxury candle experience you can feel good about - one that enhances your home's ambiance without compromising your family's health or our shared environment. Ready to Experience the Natural Difference? If you've never tried a natural wax candle before, you're in for such a treat! The difference is something you truly have to experience for yourself. Whether you're a candle aficionado looking to make a healthier switch, or someone who's been avoiding candles due to concerns about toxins, our beeswax and coconut oil candles provide the perfect solution. Shop our collection to discover your new favorite natural candle, or join us at one of our candle-making workshops to learn more about the art of natural candle creation!
At Chix and Wix, we're passionate about crafting beautiful, eco-friendly candles. But our commitment to sustainability doesn't end when you take our candles home. We're excited to introduce our innovative Refill Program, designed to reduce waste and keep your favorite candle vessels in use for years to come. How It Works: For our local Loudoun County customers, we offer a convenient and eco-conscious way to enjoy fresh candles without accumulating excess glass or ceramic containers. Here's how it works: 1. Keep your empty Chix and Wix candle vessel. 2. Contact us to arrange a meetup. 3. We'll clean your vessel thoroughly. 4. Choose your favorite non-toxic fragrance from our selection. 5. We'll refill your vessel with our signature beeswax and coconut oil blend. 6. Enjoy your renewed candle! The best part? Our refills are priced at just $1.50 per ounce, making it an affordable way to maintain your candle collection. Why Choose Refills? 1. Reduce Waste: By reusing your candle vessels, you're helping to minimize packaging waste and reduce your environmental footprint. 2. Cost-Effective: Our refill program is budget-friendly, allowing you to enjoy premium candles at a fraction of the cost. 3. Customization: Mix it up by choosing a new scent for your familiar vessel, or stick with your tried-and-true favorite. 4. Support Local: Our refill program is our way of giving back to our local Loudoun County community, fostering connections with our customers. 5. Non-Toxic Fragrances: All our refills use the same skin-safe, non-toxic fragrances you love in our original candles. By participating in our Refill Program, you're not just treating yourself to a luxurious, eco-friendly candle – you're joining us in our mission to create a more sustainable future, one candle at a time. Ready to refill? Reach out to us today and let's keep those candles burning bright and green!
One question we often get asked is whether warming a candle in a candle warmer produces the same hot fragrance throw as burning the candle with a traditional flame. The short answer is no , generally you will get a lighter fragrance when warming compared to burning. However, the effect can vary depending on the wax type and fragrance oils used. Beeswax and coconut oil candles, like those hand-poured by Chix and Wix, tend to throw fragrance very well when warmed. The natural waxes have good fragrance retention and dispersal qualities. Still, an open flame almost always releases more fragrance oil into the air. When warmed in an electric or ceramic candle warmer, you'll smell around 60-80% of the fragrance strength compared to burning an all-natural beeswax and coconut oil candle. So warming still emits plenty of gorgeous scent into a room, just slightly more subtly. As for how specific fragrance oils perform? Heavier fragrances with base notes of resins, woods, and earthy scents don’t travel as well when warmed compared to the lighter formulas. Their scent compounds require higher heat to fully volatilize into the air. No matter if you prefer to warm or burn natural beeswax and coconut oil candles, you’ll be greeted with Chix and Wix’s signature cozy, welcoming scents. Warming just creates a gentler fragrance experience. Try it out and let the lovely aroma fill your space! Order your safe and exquisite candle from Chix and Wix.
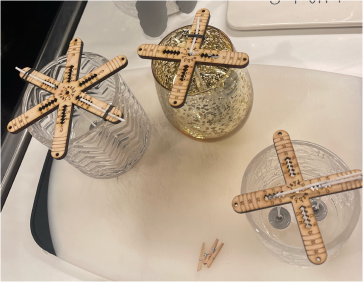
Candles have been a beloved home accessory for centuries, providing warmth, ambiance, and pleasant aromas to any room. But have you ever wondered how candle makers ensure their products are of the highest quality? At Chix and Wix, Kristy and I take quality control very seriously, especially when we test the candles' containers and wicks. When making a candle, there are a few key components that must work together to create a successful product. First, the container must be sturdy and able to withstand the heat of the burning candle. We test each container by filling it with hot wax and observing how it holds up to the heat. This helps us identify any potential issues with the container, such as cracking or melting. Next, we test the wick. The wick is the component that carries the flame and allows the wax to melt and burn evenly. A wick that is too thin or too thick can cause the candle to burn too quickly or not at all. To test the wick, we light the candle and observe how the flame behaves. If it flickers or goes out, we know that the wick needs to be adjusted. Once we've tested the container and the wick, we burn the candle for several hours to ensure that it has a nice, long burn. A high-quality candle should burn evenly and cleanly, without producing excessive soot or smoke. If the candle doesn't meet our standards, we adjust the container or wick until we achieve the desired results. At Chix and Wix, we take pride in creating candles that not only look and smell great but also perform exceptionally well. By rigorously testing each candle's components, we ensure that our products meet the highest standards of quality and longevity. So the next time you light one of our candles, you can enjoy the warm glow and pleasant aroma with confidence, knowing that it was made with care and attention to detail. Order your safe and exquisite candle from Chix and Wix.

Have you ever wondered why some candles burn longer than others? In this blog post, we will explore how a 2-ounce beeswax and coconut oil candle can burn for up to 20 hours (not consecutively) and why this wax burns longer than other types of wax. Beeswax is a natural wax produced by honey bees. It is a hard, brittle wax that has a high melting point and a pleasant honey scent. Coconut oil, on the other hand, is a natural oil extracted from the meat of coconuts. It has a low melting point and is often used in candles because it burns cleanly and produces little to no soot. When beeswax and coconut oil are combined, they create a wax blend that has the best of both worlds. The beeswax provides hardness and stability to the wax, while the coconut oil lowers the melting point and improves the burn quality. This combination results in a wax that burns longer than traditional paraffin wax candles. So how does this work? When you light a candle, the heat from the flame melts the wax near the wick. This melted wax is then drawn up the wick by capillary action and is vaporized by the heat of the flame. The vaporized wax then reacts with oxygen in the air to produce heat, light, and water vapor. Because beeswax and coconut oil have different melting points, the wax blend burns more slowly and steadily than other types of wax. This slow burn allows the wax to last longer, making it a more efficient and cost-effective choice for candles. Additionally, beeswax and coconut oil candles produce less soot and pollutants than paraffin wax candles, making them a healthier choice for your home and the environment. If you are looking for a longer burning candle with a clean burn, a beeswax and coconut oil candle may be just what you need. This wax blend offers the best of both worlds, providing a stable, long-lasting burn and a clean, healthy choice for your home. So the next time you light a candle, consider using a beeswax and coconut oil blend and enjoy the longer-lasting, cleaner burn. Beeswax and coconut oil candles are popular choices for those seeking a natural and eco-friendly option. With the added benefits of using an LX cotton wick, you can maximize the use of your candle and enjoy a clean, safe, and fragrant burn. Order your safe and exquisite candle from Chix and Wix.
Beeswax and coconut oil candles are popular choices for those seeking a natural and eco-friendly option. With the added benefits of using an LX cotton wick, you can maximize the use of your candle and enjoy a clean, safe, and fragrant burn. Here are some tips for taking care of your beeswax and coconut oil candle with an LX cotton wick: Trim the wick before each use: Before lighting your candle, make sure to trim the wick to about 1/4 inch. This will prevent excessive smoke and soot, as well as prevent the flame from becoming too large. Trimming the wick also helps to ensure an even burn and extend the life of your candle. Keep the wax pool free of debris: As your candle burns, debris can accumulate in the wax pool. To prevent this, regularly remove any debris, such as wick trimmings, that may have fallen into the wax. Keeping the wax pool clean will ensure that your candle continues to burn evenly. Avoid burning your candle for more than 4 hours at a time: Overburning your candle can cause the wax to melt too quickly, which can cause the wick to become submerged and create a risk of fire. To prevent this, it's recommended to only burn your candle for 4 hours at a time and to never leave a lit candle unattended. Store your candle properly: If you're not using your candle, make sure to store it in a cool, dry place away from direct sunlight. Exposure to heat and sunlight can cause the wax to melt and change the fragrance of your candle. Use a candle snuffer: To extinguish your candle, use a candle snuffer instead of blowing it out. Blowing out the candle can cause the wick to become misshapen and create a risk of fire. A candle snuffer allows you to safely extinguish the flame without altering the wick. By following these steps, you can ensure that your candle burns cleanly and safely, providing you with the best possible experience. Whether you're relaxing at home or hosting a dinner party, your Chix and Wix candle will be a beautiful and fragrant addition to your space. Order your safe and exquisite candle from Chix and Wix.

In today's fast-paced world of e-commerce, shipping packages have become an integral part of our daily lives. However, the increasing use of packaging materials has led to an exponential rise in waste and pollution, putting a strain on our planet's resources. Chix and Wix only provide environmentally friendly packaging options. Recycled Boxes At Chix and Wix we use recycled boxes which is a crucial step in reducing waste and conserving our natural resources. By using recycled boxes, we are reducing the number of trees cut down for paper production, conserving energy, and reducing greenhouse gas emissions. Using recycled boxes also helps to reduce the amount of waste sent to landfills, where it can take hundreds of years to decompose. Recycled boxes can be reused multiple times, further reducing the need for new packaging materials. Biodegradable Packing Materials Another crucial aspect of environmentally friendly packaging is biodegradability. Traditional packing materials like Styrofoam and plastic can take hundreds of years to decompose, causing long-lasting damage to the environment. Chix and Wix use only biodegradable packing materials made from natural, sustainable sources and are designed to break down quickly and harmlessly in the environment. These materials are an excellent alternative to traditional packaging, as they help to reduce waste, conserve resources, and minimize the impact on the planet. Chix and Wix believe it is our responsibility to ensure that our packaging practices are environmentally responsible and sustainable. By using recycled boxes and biodegradable packing materials, we can positively impact the environment and conserve our planet's resources. Order your safe and exquisite candle from Chix and Wix.
Candles have been a popular source of light and fragrance for centuries. With the recent surge in demand for candles, consumers are looking for better and safer options for their homes. At Chix and Wix, we use LX cotton wicks - the new and improved solution for those seeking a consistent, clean, and safe candle-burning experience. LX cotton wicks are unique in their construction, as they are coreless, flat wicks braided with stabilizing threads. This design allows for a more stable and consistent flame, which minimizes or eliminates carbon buildup, also known as mushrooming. This not only leads to a more visually appealing candle but also helps to reduce smoke, soot, and afterglow. In contrast, traditional wood wicks often result in uneven burning, causing carbon buildup and a less visually appealing candle. The burning wood also creates a large amount of smoke, which can be problematic for those with allergies or sensitivities. Additionally, wood wicks can produce a significant amount of soot, which can be a fire hazard and create a mess on surfaces near the candle. LX cotton wicks, on the other hand, provide a much cleaner and safer option. The stabilizing threads in the wick ensure a consistent burn, reducing the risk of fire and providing a cleaner burn. This also helps to prolong the life of the candle and provide a more pleasant fragrance experience. Chix and Wix aims to provide a safer, cleaner, and more consistent option for those looking for a better candle-burning experience. Order your safe and exquisite candle from Chix and Wix.

The use of candles with different fragrances can have a variety of benefits for our health and well-being.

Hand-poured in kitchens:
Round Hill & Hamilton Virginia
Be the first to know
SECURE PAYMENTS